Saturday, January 25, 2014

Vanilla Bean Cupcakes with Pomegranate Mascarpone Frosting


I really don't know what to say right now. I usually have a whole list in my head when I start a post, but for some reason I just drew a blank. Weird, huh. Maybe it's these cupcakes and I'm just distracted by the delicious, buttery, pomegranetey, vanilla beany goodness. Or I'm really tired. Either way, these cupcakes are going to be much better than what you're reading right now. Sorry about that. I promise to do better next time. For now, I think I'll just take a nap or eat another cupcake. Most likely the latter. Times two.


Vanilla Bean Cupcakes with Pomegranate Mascarpone Frosting 
makes approx 12 cupcakes

Cupcakes:

1/2 cup (1 stick) unsalted butter, softened
3/4 cups sugar
4 egg whites
1 1/2 cups flour
1 1/2 tsp baking powder
pinch of salt
1 tsp vanilla extract
2 whole vanilla beans

Frosting:

1 cup heavy cream
8 oz mascarpone
4 1/2 cups confectioners sugar
1/3 cup pomegranate juice

fresh pomegranate seeds, optional

Directions:


  1. Preheat oven to 350.
  2. In the bowl of a stand mixer, cream butter until smooth. Add in the sugar and beat until light and fluffy.
  3. Add in the egg whites and beat. Slowly mix in the flour and baking soda.
  4. Split the beans lengthwise and scrape out the inside. Mix in the vanilla beans and extract.
  5. Line a cupcake tray with liners and fill 2/3 of the way with batter.
  6. Bake for 22 - 25 minutes.
  7. While the cupcakes are baking, make the frosting:
             1. Beat the heavy cream until it forms soft peak, like a whipped cream. Add in the mascarpone until               smooth.
             2.  Add in the confectioners sugar a cup at a time. Be sure to mix all the way.
             3. Pour in the pomegranate juice and whip until it's all mixed together. The frosting should be a little                 thin. 
     8. Let cupcakes cool before frosting. Top with fresh pomegranate seeds if desired.


Tuesday, December 31, 2013

Caramel Brownie Trifle


I can still remember when I was little and my mom used to make trifles--for everything. And they tasted amazing. Layers of Cool Whip, pudding, cake, Oreos, chocolate, fruit, and everything else you could imagine. Sooo, when I was put to the task of bringing a dessert to our neighbor's new years party, my mom suggested a trifle. I had some left over caramel in my fridge from all of my Christmas orders and I love chocolate with caramel, so I ended up making a brownie, Oreo, caramel, Cool Whip trifle. Try saying that 3 times fast.


Mmmm, brownies.


Use this as an opportunity to get your anger out....


I used homemade caramel but store bought is okay too.


If you want a lot of cool whip, buy one big tub and one small tub.


I love my new Vera Bradley oven mitt. My bestfriend gave it to me when she came from Texas. I kinda wanted to go back with her, not only so we could spend time together, but just so I could go to Texas.


Crumble 'em up into decent sized chunks. I would let them cool before doing this to avoid getting sticky hands.


one layer of brownie //


one layer of cool whip //


one layer of Oreos and caramel //


decorate //


I made little chocolate squigglies and stars since it was a new years party, but you can keep it plain.


Caramel Brownie Trifle

Ingredients:

1 box of brownie mix and ingredients needed to make it
3/4 cup caramel, homemade or store bought
1 package of Oreos
1 16 oz tub Cool Whip
chocolate chips, optional

Directions:

  1. Make the brownies in a 9 x 9 in pan. Let cool. Crumble on to a plate.
  2. In a plastic bag, crush the oreos with a rolling pin or the back of a spoon.
  3. Layer 1/3 of the brownies on the bottom of a trifle bowl. Spread 1/3 of the cool whip on top. Sprinkle on 1/3 of the Oreos and drizzle on some of the caramel. 
  4. Repeat until all of ingredients are gone, ending with the cool whip. Sprinkle with any extra crushed oreos and caramel. Melt chocolate chips and drizzle over the top, if desired.

"Almost French Toast" with Coffee Frosting


I absolutely love Sunday breakfast. Especially ooey, gooey cinnamon rolls. I also love anything with syrup on it, like french toast, with loads and loads of syrup. But I hate eggs. Yes, I know, its almost a sin, but I do. That's why I made almost french toast. Not to many eggs, way to much syrup. And butter. And sugar. And it's perfect for breakfast with a hot cup o' joe.


Rip the bread into semi tiny pieces, unless you're OCD and have to cut them up into perfect squares


Make the "coating" with eggs, milk, sugar, and vanilla. I only had three eggs and made this at 9:00 am on Sunday morning. Whoops.


Then whisk it all together. The sugar should be well incorporated the mixture should be thickish.


Now pour the mixture all over the bread without spilling it. That was a challenge since I had a camera in the other hand...


This mixture is almost like a strudel,which is one of the reasons this is almost french toast. The other reason is that if you eat this everyday for breakfast you'll almost become so hyper with sugar that you won't need any coffee. That was a warning.


Mix it together with a fork or a pastry cutter.


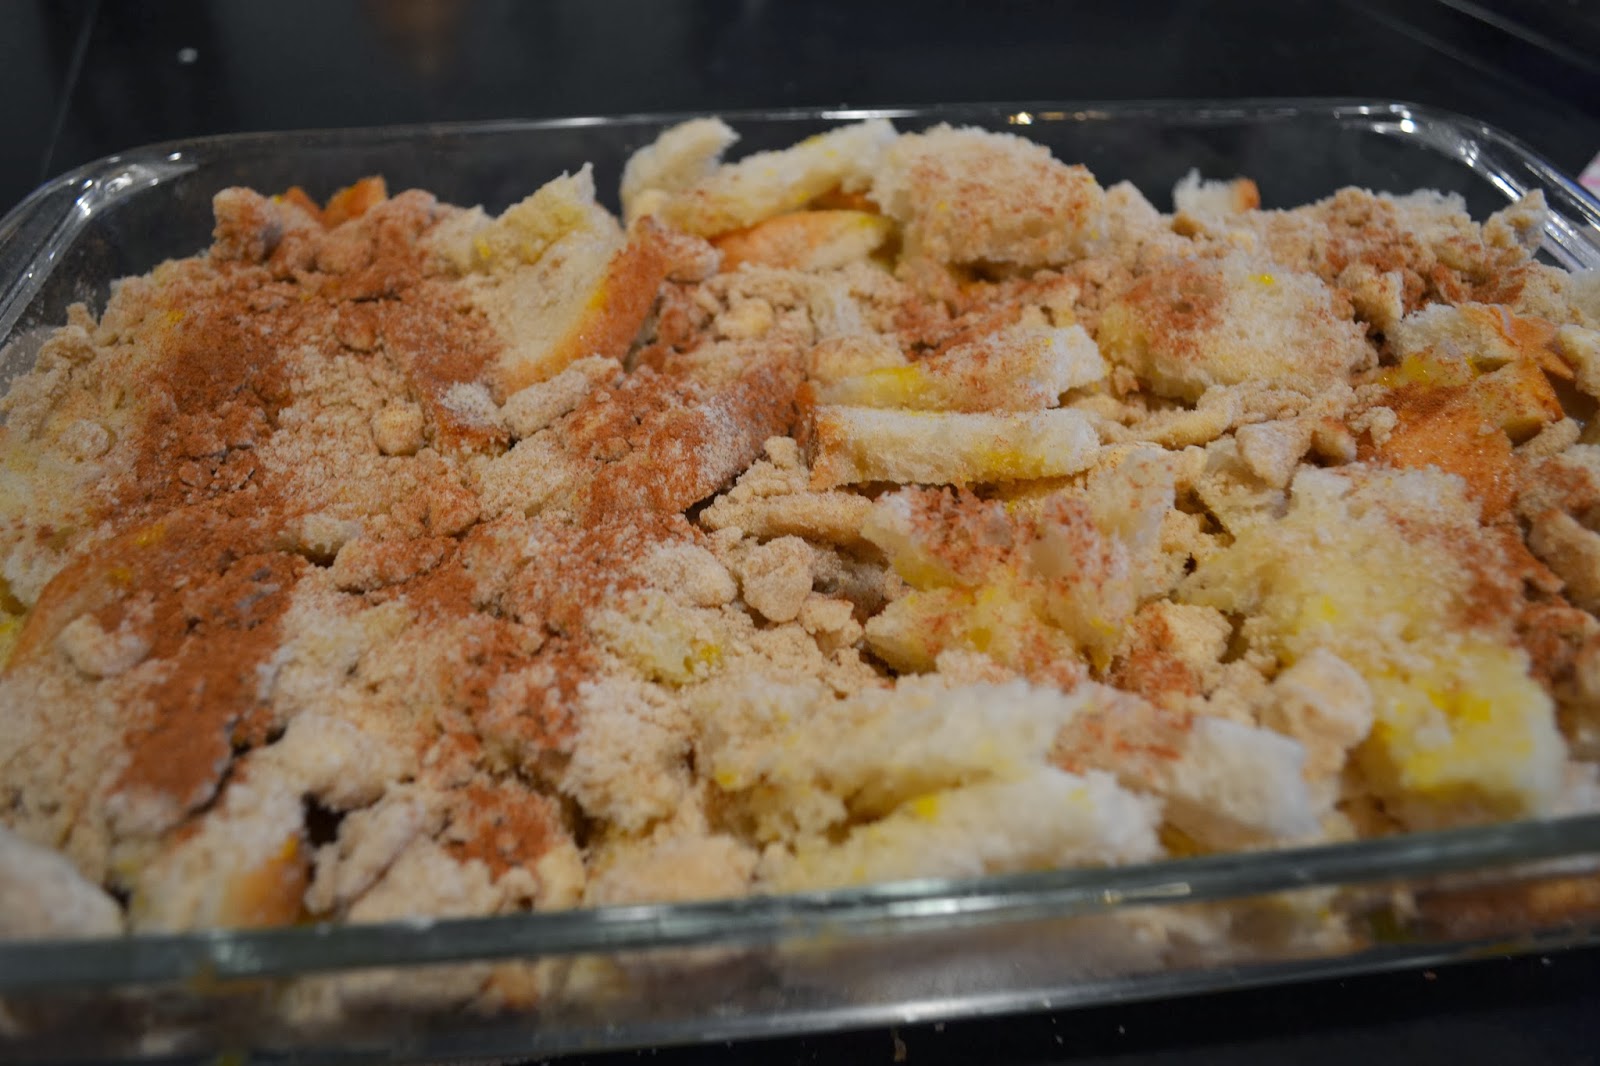
Sprinkle the mix over the top so that it's layered evenly.


Lightly sprinkle on the cinnamon. It gives it a nice flavor and color.


Into the oven it goes! Bake until bubbly or wait until it gets crispy depending on your liking.


The espresso is what makes the french toast a little more breakfasty. I absolutely love this Oreo mug. Not only does it look cool, but oreos are probably the best cookie on the planet, hands down. As long as their double stuffed.


Oooo, frosting.


And, it's done! Ooey gooey, crispy, crunchy, almost french toast.


no comment....


Almost French Toast

Ingredients

1/2 loaf of crusty Italian bread
4 eggs
1/2 cup sugar
1/2 cup milk
1 tsp vanilla extract
1 stick butter, softened
1 cup brown sugar
1/2 cup flour
1 1/2 tbs cinnamon

1 cup confectioners' sugar
4 tbs milk
1 tbs freshly brewed espresso

Directions:
  1. Preheat oven to 350.
  2. Break up bread into a 13 by 9 inch Pyrex.
  3. In a bowl, whisk together the eggs, milk, sugar, and vanilla. Pour over the bread.
  4. In a separate bowl, mix together the brown sugar, flour, and butter, sprinkle on top of the bread mix.
  5. Sprinkle the cinnamon on top.
  6. Place in the oven and bake for 45 minutes to an hour, depending on how crispy you want it.
  7. While the french toast is baking, mix together the espresso, confectioners' sugar, and milk.
  8. Remove from oven and serve warm with coffee frosting, regular frosting, powdered sugar, or plain *twitch*.

Monday, December 2, 2013

Decking the Halls

My family is always ahead on the holidays. My Great Aunts make and freeze the food a couple weeks prior to Thanksgiving and my mom and my aunt have their Christmas decorations up the day after Thanksgiving. So, being ahead of everything and all, over the weekend, my family, my aunt's family, and my grandpa took a trip up to Maple Row Tree Farm in Easton, CT.


When we got there, we couldn't believe the abundance of trees lined up on the hills! We went straight to work, grabbing our saws and keeping an eye out for the perfect tree. We walked through rows and rows of them. After a while, they all looked the same to me, and that made it even harder to pick one out. Finally, after wandering through evergreen after evergreen tree, we narrowed it down to 3 trees. Then to 2. And then 1. I was starting to worry that we would be there until the farm closed, but surprisingly we decided. My grandpa cut ours down in one and a half minutes, record time! My cousin Sam picked their tree, and her brother Joe cut it down. We wrapped up our trees, threw 'em on the roofs of our cars, and headed back home. 

My grandpa cutting down our tree (left)                                                                                                                                                                                                                                                                                                                                                                                                                                                                                                                                                                                                                                                                                                                       Our tree's stump (right)

Now, my mom has a very specific way of decorating our tree. I mean, Bible. First, of course, we put the tree in the stand. Next, we put the star on top as usual. Then go the lights. My mom took them off and put them back on about three times. See? Very specific. She then puts on ribbon and bows. She owned a gift basket store for 13 years, so she makes a lot of bows, no exaggeration. Then she adds picks. This year it was green poinsettias and sparkly twigs. Finally, we got to add on the ornaments. On the right side of the tree, we have all of the ornaments we made in school, such as my brother's "cookies and milk on a plate" or my sister's "glittery toothpick snowflake." On the rest of the tree we put up decorative eggs. You know, think Waterford, loaded with sparkles and glittery designs. At least 3 dozen of them get put up. They look beautiful, especially with the Christmas lights!


As you can see... I'm a little bit obsessed with blurred lights.
Maybe a lot.


These are my favorite ornaments on my Christmas tree. I love the sparkliest, brightest, most colorful ones. My brother got the ornament on the bottom left-hand corner so he could make sure Santa comes to our house. How cute is he?


My mom also decorates our mantel with loads of flowers, lights, and glittery stuff. We hang Santa hats instead of stockings too.


Even our front window is decorated with mini trees and lights.


My brother loved decorating the tree. He arranged each ornament perfectly and 
made sure they looked good!


It's a little blurry, but this is my favorite ornament in our entire "collection." Yes, we have a "collection."

The tree looked pretty good after all of that work! On a side note, hopefully I'll have some more holiday posts up soon. But for now, happy holidays to everyone!

Monday, October 21, 2013

Project Cupcake

 Last week, my friend Emma and I were assigned to do a project together. The assignment was to find a "How-To Book", read it, and create a presentation teaching the class on that subject.

So of course, I had to choose a cupcake book. We decided to do our project on The Cupcake Diaries by Katherine and Sophie Kallinis, the owners Georgetown Cupcakes in DC. After flipping through dozens of recipes, we agreed on Caramel Apple Cupcakes, just in time for fall. We made the cupcakes, frosting, and caramel the night before and brought them into class the following day. Then we taught them how to frost a cupcake, drizzle the caramel on top, and eventually we passed them out to the class. For our visual, we made a short video on how we made the cupcakes. It came out really nice and for once I wasn't ashamed of watching myself on camera!


Sunday, October 6, 2013

Starbucks Remake #2: Salted Caramel Mocha Cupcakes


My new addiction: salted caramel mocha lattes. This is probably the best coffee I have ever had. I could easily chug a vente in less than an hour. The weather right now prompts me to grab one and sit at home with a warm blanket on and watch TV.

Due to my love of this Starbucks delight, I thought a cupcake version of it would taste heavenly. That might actually be an understatement...


Salted Caramel Mocha Cupcakes
yields aprox. 2 dozen cupcakes

Ingredients

Cake:
1 ¾ cup all-purpose flour     
1 ¾ cup sugar
1 ½ cup cocoa powder
2 tsp baking powder
1 tsp baking soda
pinch of salt
½ cup vegetable oil
1 cup buttermilk
2 large eggs
1 tsp pure vanilla extract
1 cup hot, freshly brewed espresso

Frosting:
3 sticks (1 ½ cups) of salted butter
3 cups confectioners’ sugar
1 tsp vanilla extract
1 tbsp cold milk

caramel (any kind, store bought or homemade)
sea salt

Directions:

For the cake:

1.       Preheat oven to 350.
2.      Line cupcake tins with cupcake liners and set aside.
3.      In a medium sized bowl, whisk together the dry ingredients.
4.      In a separate bowl, beat the eggs, vegetable oil, buttermilk, and vanilla extract until combined.
5.      Pour the buttermilk mixture into the dry ingredients and mix together until the batter is thick and all the flour is incorporated.
6.      Slowly pour in the espresso and slowly stir in. The batter should be thin.
7.      Fill each liner ¾ of the way.
8.      Bake for 15 minutes. Cake should spring bake when touched.
9.      Remove from the oven and let cool for 15 minutes.

For the frosting:

1.       In the bowl of a stand mixer fitted with a whisk attachment, cream together the butter and the confectioners’ sugar.
2.      Add the vanilla and the milk and cream until smooth.

Core out the center of all the cupcakes and keep the tops. Then fill them with any caramel you choose (I make my own homemade caramel but store bought works well too). Put the tops back on. Put frosting in a bag fitted with a star tip. Frost each cupcake and drizzle with caramel. Sprinkle a tiny bit of sea salt on top for taste.